Gluten Free Gingernuts
- Dec 8, 2020
- 3 min read
Takes 1 hours, makes 25 biscuits.
This was by far, the most difficult recipe to get right. Not only does a Gingernut need to hold itself together when dunked in a cup of tea, it also needs to have that characteristically cracked shell, and boy - was that a challenge and a half. But I'm so happy to finally be able to share with you my gluten free ginger nut recipe, especially as it's Christmas time and there is no better flavour than ginger at Christmas. There are a couple of particulars of this recipe that you need to pay attention to so make sure you read below for the breakdown on how to get the perfect Gingernut!

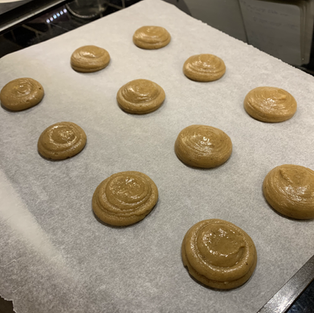
How to get that beautiful cracked texture...
Getting this texture was a lot more difficult that I realised - however super easy when you know how! It turns out that the temperature and consistency that the dough is when it's put into the oven plays a huge role. It needs to still be warm, and have a slightly runny consistency. This dough is mixed in a saucepan over a medium heat, and once you take toff the heat it will slowly start to firm up - but as it gets firmer, it will not form the cracked consistency when it's baked. You couldn't imagine my confusion when half the batch was turning out great, and then the next half were coming out too smooth! So to get the right consistency, it's best to use all the dough at once, and cook them at the same time on different racks of the oven.
See the picture below to check out the difference between using a warm and loose dough (right), and when the dough had cooled down (left).

How to make them crunchy...
Another tricky element of the gingernut, making them firm. And I will admit, I've got them to a place I'm happy with, but I will be further workshopping these in the future, I will update this recipe as I go!
I found that you really have to leave these in the oven as long as possible, and you don't want to cool them too quickly either! If you are finding that they aren't crunchy enough, you can always bake them for the first 15 minutes on 180°C, and then reduce the temperature to 120°C for another 15.

I N G R E D I E N T S
100 grams of butter
1/2 cup brown sugar
3 tbsp of golden syrup
4 tsp of milk (I used almond)
1 tsp baking soda
1 3/4 cups of gluten free flour
4/5 tsp ginger powder (depending on how ginger-y you want them)
1/2 tsp ground cloves
M E T H O D
Preheat oven to 180° celsius, and line a baking tray with baking paper.
In a saucepan over a medium heat, melt together the butter, sugar, golden syrup, and milk stir with a wooden spoon until they are all combined.
Quickly stir in the baking soda and remove from the heat.
Sift in the gluten free flour, ginger, and cloves and mix until you can't see any bits of flour hanging around.
At this point the mixture should still be a runny (it's important that you don't let the mixture cool too much or if won't produce the desired texture), pour this mixture into a normal piping bag (no nozzle) and then pipe the dough onto the baking tray, making them roughly about 5cm in diameter and giving them about 3cm of height. (This is just the measurements I used, but it's by no means important to stick by them). Make sure you leave about 5cm of space in between each biscuit because they will spread. You may need to use two trays as you want all the dough to be going in at the same time, otherwise it will harden and not become a classic ginger nut!
Bake for 15-20 minutes, until the are nice and golden. Then switch off the oven and leave them in there for a further 10 minutes.
Remove from the oven and let them cool on the baking tray.
Keep them in a sealed container for up to a week.


If you enjoyed this recipe, don't forget to go have a look at some other class New Zealand bakes, like Squiggles, Mint Slice, and Lamingtons!


Hi I'd dearly love a weight for the flour in this recipe as I can't use commercially available mixes. Thank you for these great recipes!
Hi, we seem to get only a really dry mixture and only 12-16 biscuits is 4tsp milk correct or should it be tbsp? Do you have a favourite gf flour brand? Thanks